Connecting to Your Drone
Follow this step-by-step guide to connect to your drone and configure its network. While some steps are universal across products, others vary depending on your specific model. Use the tabs to select the guide tailored to your product.
Head back to the Product page and start with the initial steps outlined there. They’ll point you to the correct tutorial for your specific drone.
Your drone may have custom instructions available. If so, they can be found under the 4. Custom Instructions chapter on the Product Page.
On all our platforms, we use Netplan to manage the network configuration. The netplan config file is located at /etc/netplan/01-netcfg.yaml. This file allows you to configure your network and associated IP addresses.
For your information, a netplan config file with no DHCP on both Ethernet and Wi-Fi interfaces looks like this:
network:
  version: 2
  renderer: networkd
  ethernets:
    eth0:
      dhcp4: no
      dhcp6: no
      addresses:
        - 192.168.1.10/24  # Static IP for eth0

  wifis:
    wlan0:
      dhcp4: no
      dhcp6: no
      addresses:
        - 192.168.2.20/24  # Static IP for wlan0
      gateway4: 192.168.2.1  # Default gateway for wlan0
      nameservers:
        addresses:
          - 8.8.8.8  # DNS server for wlan0
      access-points:
        "Your_SSID":
          password: "Your_WiFi_Password"
Connecting via Physical Access Point
If you received a physical acces point as part of your project, your drone should be able to connect to it by default.
Steps to Connect
-
Power the access point and wait a short time for it to boot.
-
Power the drone and the on-board computer (if needed). After a short time, it should automatically connect to the access point.
-
On your computer, connect to the wifi of the access point. Information such as SSID and password will be provided with the access point.
-
Open a terminal and try to ping the drone on the network:
ping <static_ip>Static IP
The static ip of the drone on the physical access point will be provided to you. We typically use 192.168.12.101 for UAV1, 192.168.12.102 for UAV2 and so on but this may differ.
-
SSH into the drone:
ssh uav@<static_ip>Use the password:
f4f. -
Modify the Netplan Configuration (only if you want to stop using the physical access point):
sudo vim /etc/netplan/01-netcfg.yaml -
Apply the Network Settings:
sudo netplan apply -
Verify the connection by pinging the drone’s IP:
ping <new_static_ip>
Connecting via Virtual Access Point (AP) Mode
Most of our drones are equipped with a built-in Access Point (AP) mode enabled by default. This mode allows you to connect directly to the drone’s Wi-Fi network for configuration.
Steps to Connect
- DEFAULT DRONE
- RoboFly
-
Power on the drone:
- Plug in the battery to power on the drone.
- Press the power button on the drone and wait approximately 20 seconds for the onboard computer to boot up.
-
Trigger the AP mode and connect to it:
- Check the available Wi-Fi networks to see if the AP mode is already running. The SSID is
$(UAV_NAME)_WIFI. - If you do not see the AP SSID:
- Press the power button of the host computer three times (at least 1-second interval between presses).
- Wait a few seconds for the AP mode to activate. A network named
$(UAV_NAME)_WIFIwill appear.
- Use the password:
$(UAV_NAME)@f4fto connect.
- Check the available Wi-Fi networks to see if the AP mode is already running. The SSID is
If the AP network does not appear:
- Ensure all power button presses were registered. Some successive presses might be too quick.
- Remember to wait at least one second between presses.
- You can press as many times as needed; it will not damage the system.
- Retry the procedure.
The hard reboot mechanism is still active. If you press the power button once for 5 seconds or more, the system will reboot.
-
Power on the drone:
- Plug in the battery to power on the RoboFly. The onboard computer will boot within one minute.
-
Access AP mode:
- RoboFly’s AP mode is enabled by default. A Wi-Fi network named
$(UAV_NAME)_WIFIshould appear. - Use the password:
drone@f4fto connect.
- RoboFly’s AP mode is enabled by default. A Wi-Fi network named
If the AP network does not appear:
- The Raspberry Pi probably did not boot correctly. Unplug the battery, wait a few seconds, and plug it back in.
- The power LED of the Raspberry Pi below the cover should be green.
- Retry the procedure.
-
SSH into the drone:
- Open a terminal on your computer and run the following command:
ssh uav@192.168.12.1 - Use the password:
f4f.
- Open a terminal on your computer and run the following command:
-
Configure the network:
- Decide between setting up the drone for your own Wi-Fi or keeping AP mode active. You can modify this setting later.
Option 1: Connect to Your Wi-Fi (recommended for flying)
- Run:
configure_netplan_and_kill_ap.sh - Follow the prompts to set your Wi-Fi SSID, password, and static IP.
Option 2: Keep AP Mode (recommended for setup)
- Continue using the static IP:
192.168.12.1for direct access.
The AP mode is not recommended for flying as:
- Depending on the frequency used, it might interfer with the RC radio signal (the RC emits on the 2.4GHz band).
- The bandwidth might not be sufficient for certain applications such as video stream.
External Monitor Configuration
If AP mode is unavailable, you can connect the drone to an external monitor for configuration.
Steps to Connect via External Monitor
-
Set up the hardware:
- Connect a monitor via HDMI.
- Connect a keyboard and mouse via USB.
-
Log in to the drone:
- Power on the drone.
- Use the following credentials:
- Username:
uav - Password:
f4f
- Username:
-
Modify the Netplan Configuration:
sudo vim /etc/netplan/01-netcfg.yaml -
Apply the Network Settings:
sudo netplan apply -
Verify the connection by pinging the drone’s IP:
ping <new_static_ip>
Configuring /etc/hosts with the Static IP
Whether you chose Option 1 or Option 2, it is recommended to update the /etc/hosts file on both the drone and your computer. This ensures reliable communication between the devices during various operations.
Case: Option 1 (Connect to Your Wi-Fi)
If you selected Option 1, you configured a static IP for the drone during the execution of the configure_netplan_and_kill_ap.sh script. Follow these steps to update the /etc/hosts files:
On Your Computer
-
Open the
/etc/hostsfile withsudoprivileges:sudo vim /etc/hosts -
Add the drone's static IP and its hostname (e.g.,
uav42) to the file:static_ip_of_drone uav_nameFor example:
192.168.2.20 uav42 -
Save the file and exit.
-
Test the connection:
ping uav_nameIf the drone is powered on and connected to the network, you should see successful ping responses.
On the Drone
If your computer also uses a static IP for this network, it is recommended to update the drone's /etc/hosts file as well:
-
SSH into the drone:
ssh uav@static_ip_of_drone -
Open the
/etc/hostsfile:sudo vim /etc/hosts -
Add your computer’s static IP and hostname:
static_ip_of_user my_hostnameFor example:
192.168.2.50 abo974 -
Save the file and exit.
-
Test the connection from the drone:
ping my_hostname
Case: Option 2 (Keep AP Mode)
If you selected Option 2, the drone already has a static IP (192.168.12.1) in AP mode. Follow these steps to update the /etc/hosts files:
On the Drone
You can assign your computer a static IP for the AP network and update the drone's /etc/hosts file accordingly:
- SSH into the drone:
ssh uav@192.168.12.1 - Open the
/etc/hostsfile:sudo vim /etc/hosts - Add a static IP and hostname for your computer (see the image below as an example):
new_static_ip_of_user my_hostname
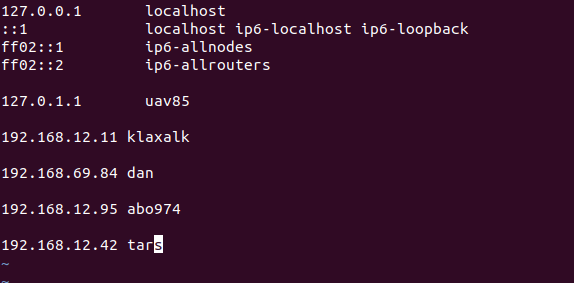
For example:
192.168.12.95 abo974
-
Save the file and exit.
-
Test the connection from the drone:
ping my_hostname
On Your Computer
To communicate with the drone’s AP, configure your computer as follows:
-
Set a static IP for your computer in the AP network (e.g.,
192.168.12.95):- Open your network settings and manually assign the static IP, with the netmask set to
255.255.255.0.
- Open your network settings and manually assign the static IP, with the netmask set to
-
Open the
/etc/hostsfile withsudoprivileges:sudo vim /etc/hosts -
Add the drone’s static IP and hostname:
192.168.12.1 uav_nameFor example:
192.168.12.1 uav42 -
Save the file and exit.
-
Test the connection:
ping uav_nameIf the drone is powered on and the AP is active, you should see successful ping responses.
By following these steps, you ensure bidirectional communication between your computer and the drone, enabling seamless operation and control.