Configuring Your Drone's Network
Follow this step-by-step guide to connect to your drone and configure its network. While some steps are universal across products, others vary depending on your specific model. Use the tabs to select the guide tailored to your product.
On all our platforms, we use Netplan to manage the network configuration. The netplan config file is located at /etc/netplan/01-netcfg.yaml. This file allows you to configure your network and associated IP addresses.
For your information, a netplan config file with static IP addresses for both, Ethernet and Wi-Fi interfaces, looks like this:
network:
  version: 2
  renderer: networkd
  ethernets:
    eth0:
      dhcp4: no
      dhcp6: no
      addresses:
        - 192.168.1.10/24 # Static IP for eth0

  wifis:
    wlan0:
      dhcp4: no
      dhcp6: no
      addresses:
        - 192.168.2.20/24 # Static IP for wlan0
      routes:
        - to: default
          via: 192.168.2.1 # Default gateway for wlan0
      nameservers:
        addresses:
          - 8.8.8.8 # DNS server for wlan0
      access-points:
        "Your_SSID":
          password: "Your_WiFi_Password"
Connecting to Your Drone
There are two ways to reach your drone to apply a configuration like this one. Pick the method that matches what came with your project.
Method 1: Wi-Fi Access Point
If you received a physical access point as part of your project (e.g., a Cudy AX3000), you can use it to connect to your drone. The access point will provide a Wi-Fi network and your drone should be able to connect to it by default.
Steps to Connect
-
Power the access point and wait a short time for it to boot.
-
Power the drone and the on-board computer (if needed). After a short time, it should automatically connect to the access point.
-
On your computer, connect to the wifi of the access point. Information such as SSID and password will be provided with the access point.
-
Open a terminal and try to ping the drone on the network:
ping <static_ip>Static IP
The static ip of the drone on the physical access point will be provided to you. We typically use
192.168.10.101for UAV1,192.168.10.102for UAV2 and so on, but this may differ. -
SSH into the drone:
ssh uav@<static_ip>Use the password:
f4f. -
Modify the Netplan Configuration (only if you want to stop using the physical access point):
sudo vim /etc/netplan/01-netcfg.yaml -
Apply the Network Settings:
sudo netplan apply -
Verify the connection by pinging the drone's IP:
ping <new_static_ip>
Method 2: External Monitor (No Wi-Fi Available)
If AP mode is unavailable, you can connect the drone to an external monitor for configuration.
Steps to Connect
-
Set up the hardware:
- Connect a monitor via HDMI.
- Connect a keyboard and mouse via USB.
-
Log in to the drone:
- Power on the drone.
- Use the following credentials:
- Username:
uav - Password:
f4f
- Username:
-
Modify the Netplan Configuration:
sudo vim /etc/netplan/01-netcfg.yaml -
Apply the Network Settings:
sudo netplan apply -
Verify the connection by pinging the drone's IP from your computer:
ping <new_static_ip>
Configuring /etc/hosts
Whichever method you used above, it is recommended to update the /etc/hosts file on both the drone and your computer once the drone has a stable IP. This ensures reliable communication between the devices during various operations (SSH by hostname, Rviz, ROS tools, and so on).
On Your Computer
-
Open the
/etc/hostsfile withsudoprivileges:sudo vim /etc/hosts -
Add the drone's static IP(
192.168.12.1if it's in AP mode) and its hostname (e.g.,uav42) to the file:<drone_static_ip> <uav_name>For example:
192.168.2.20 uav42 -
Save the file and exit.
-
Test the connection:
ping <uav_name>If the drone is powered on and connected to the network, you should see successful ping responses.
On the Drone
If your computer also uses a static IP for this network, it is recommended to update the drone's /etc/hosts file as well:
-
SSH into the drone:
ssh uav@<static_ip_of_drone> # 192.168.12.1 if in AP mode -
Open the
/etc/hostsfile:sudo vim /etc/hosts -
Add your computer's static IP and hostname:
<static_ip_of_user> <my_hostname>For example:
192.168.12.95 abo974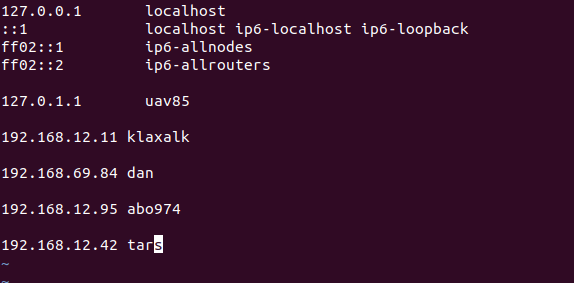
-
Save the file and exit.
-
Test the connection from the drone:
ping <my_hostname>If the drone is powered on and the AP is active, you should see successful ping responses.
By following these steps, you ensure bidirectional communication between your computer and the drone, enabling seamless operation and control.