Using Your Drone
Follow this step-by-step guide to see how your drone works on the inside and how to interact with it day to day. While some steps are universal across products, others may vary depending on your specific model. Use the tabs to select the guide tailored to your product.
Our drones are unique platforms that let you build custom features on top of prebuilt autonomous flight capabilities, both indoors and outdoors. This is powered by the MRS UAV System, which typically comes pre-installed and runs on the drone. Depending on the project, it may also need to run on your PC, in that case, follow the Installation guide to set it up.
- CUSTOM DRONE
- RoboFly
Since the MRS UAV System is installed natively on the drone's onboard computer, there is no container layer or web dashboard sitting between you and the system. You interact with it directly over SSH (see the Network page).
Tmuxinator Sessions
Once connected, launching, monitoring and stopping the system is done through Tmuxinator-managed tmux sessions rather than a GUI. A prepared session is already available in the example_session folder in the drone's home directory:
cd ~/example_session/ # or cd ~/example_session/outdoor # if you have multiple sessions available
./tmux.sh
A typical session folder consists of:
config: Configuration files related to the flight and core UAV settings.session.yml: The launch commands for every node and script the session starts, organized into tabs.record.sh: Starts the ros bag recording of the session, which is useful for debugging and post-flight analysis.tmux.sh(orstart.sh, depending on the session): Runssession.ymlthrough Tmuxinator.kill.sh: Stops all nodes and closes the tmux session.
If your drone does not have the MRS UAV System and ROS installed natively, the session may be running inside a Docker container. In that case, the start.sh will launch the container first, and then run the session inside it.
Besides the previously mentioned files, which are inside of the tmux folder, the session may also include a compose.yml file, a logs folder, and a Dockerfile.
If you want to know more about how Docker works, please refer to the Docker documentation.
Navigate through the tabs to see the different outputs. Some of the most common ones are:
- status: Shows the current state of the drone. You can also interact with the drone from this tab (press
hto list the available commands). - core: Outputs from the different "Managers" that run concurrently. More information here.
- hw_api: Information related to the interface between the core and the autopilot.
- roscore or zenoh: Runs the main roscore or zenoh node, which is the backbone of the ROS system.
- takeoff or autostart: Automates the drone's takeoff routine. More information here.
More tabs may be available depending on the session, the sensors in use, and the required functionalities.
Our system uses custom bindings to navigate within the tmux session. Refer to the tmux section of this cheatsheet.
Avoid editing the example session in place. Copy it as a starting point for your own sessions instead.
Before flying or customizing RoboFly, it's important to familiarize yourself with how the system works internally. You have two main ways to interact with RoboFly:
- SSH, a terminal connection into the drone's computer (see the Network page).
- Portainer, a web dashboard for everything Docker-related running on RoboFly.
The following focuses only on Portainer, since it will be your primary tool for interacting with RoboFly.
Since RoboFly runs Raspberry Pi OS (Linux distro based on Debian) as its native operating system, you cannot directly run ROS with the MRS UAV System, which handles most of the internal operations. This also applies to development and customization. Therefore, RoboFly utilizes Docker containers, which allow you to interact with the system.
Portainer
Enter https://192.168.12.1:9443 (change the IP if you don't have the drone in AP mode). If it's your first time connecting, your browser will warn you that the connection isn't secure — this is expected, since RoboFly signs its own certificate locally rather than using one from a public certificate authority. You need to tell the browser to trust it anyway:
You will then see a login screen for a third-party service called portainer.io, which provides the GUI you'll use to manage Docker on RoboFly. The login name and password are both admin, and you can change them later.
Portainer gives you a visual dashboard for everything Docker-related running on RoboFly — containers, images, and logs — instead of managing them by hand over SSH. You can also upload and run your own Docker images and containers here.
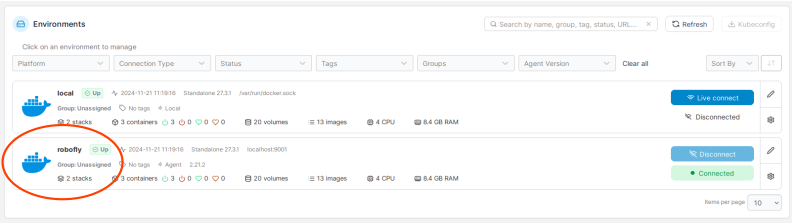
When you connect to the website, always select the RoboFly environment, not local.
Images
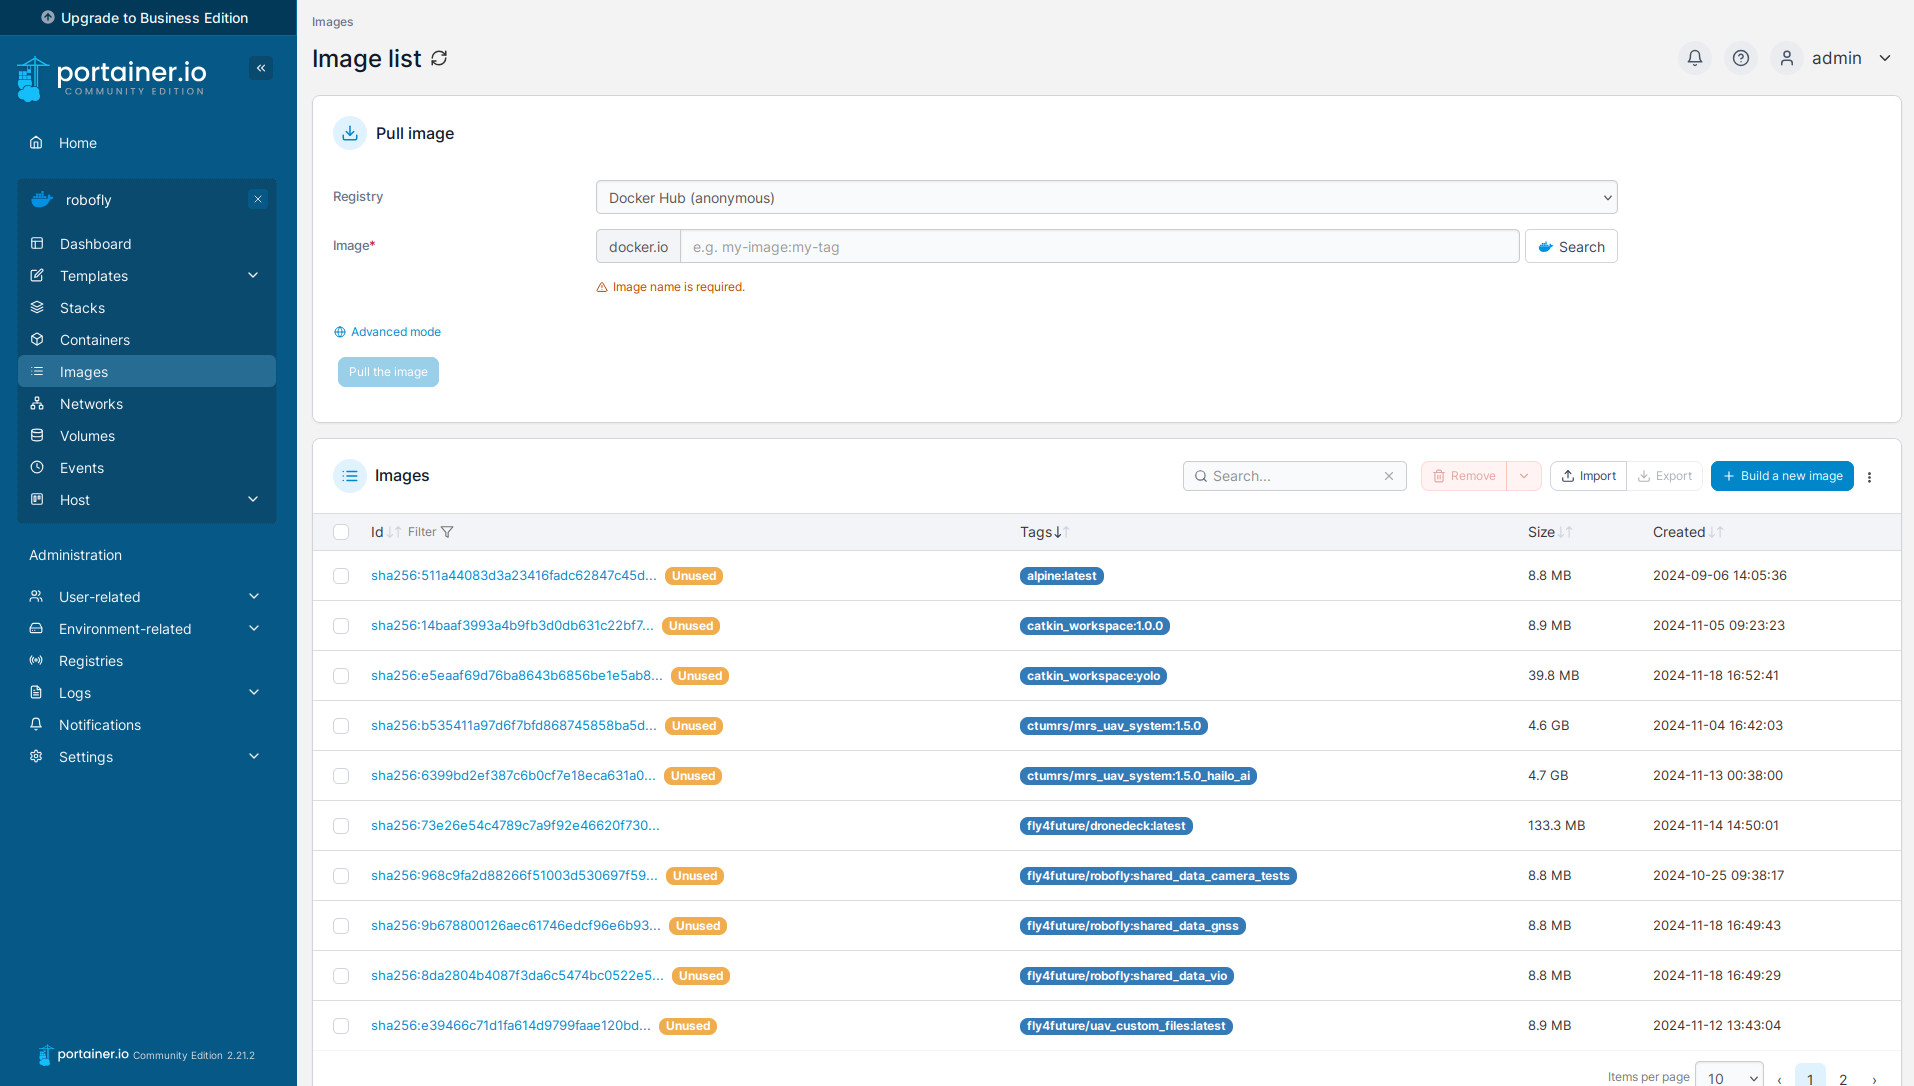
In the Images tab, you can see which Docker images are available on RoboFly. You can upload your own custom image here. Check out this tutorial on how to do so.
Do not delete or modify any of the default images, as they are all necessary for proper operation.
Stacks
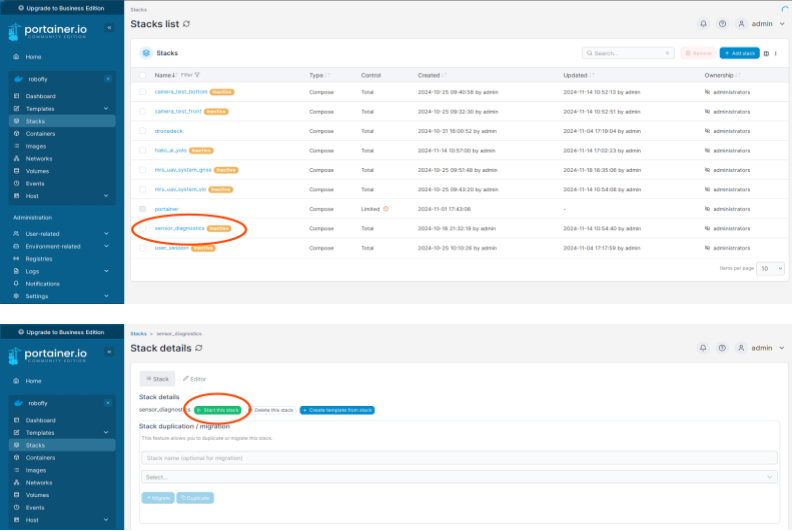
Next, navigate to the Stacks tab. A stack is essentially a "compose session" in Docker terminology. Here, you can see and run stacks of prepared images. Click on a stack to view its Stack details, and press the green button to Start this stack. You should see a blue loading bar at the top indicating the startup progress. To stop the stack, click Stop this stack.
Do not delete or modify any of the default stacks, as they are all necessary for proper operation.
By default, only one stack should be running: portainer. The portainer stack runs the Portainer service and cannot be turned off.
Once you start a stack, you can see all the containers it uses in the Containers tab. The first column shows the container's name, and the second column shows which stack it belongs to. The third column has several icons for interacting with each container:
The first icon, Logs, shows reports from the selected container. The Stats icon provides CPU and other performance information. To interact with a container, click the Exec Console icon, though you cannot interact with ROS this way.
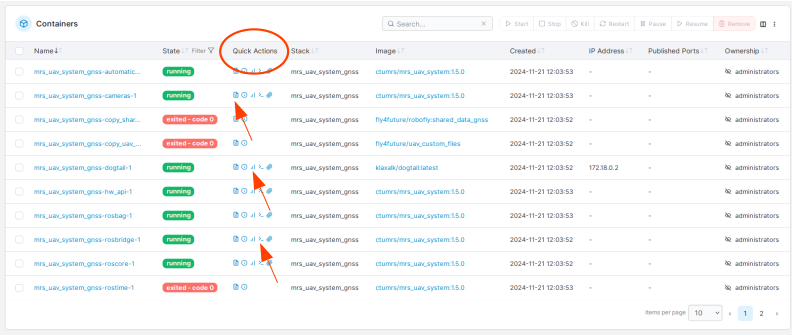
To access ROS, each stack includes a terminal container. By clicking the Attach Console icon, you will open a terminal where you can use ROS. The terminal container may sometimes be on a next page.

You can use user_session as a template for your own program (ROS node). It consists of 4 essential containers and you should base all your custom programs on it.
Common Stacks
mrs_uav_system_gnnsactivates RoboFly's control system, including everything needed for flight with GPS.camera_test_bottomandcamera_test_frontare used mainly for the diagnostics and calibration during the pre-shipment phase and you do not need to do anything with them. They can be useful if you plan to modify the cameras themselves.mrs_uav_system_vioruns the MRS System and visual odometry on the bottom camera, allowing for indoor flight. It is not recommended to modify this unless you are confident in your understanding.hailo_ai_yolois an example of a neural network running on the AI kit's neural core processor (only for RoboFly Vision). You need to run one of the two mrs stacks or thesensor_diagnosticsfor it to work.