Autonomous Flight
Follow this step-by-step guide to fly autonomously with your drone. While some steps are universal across products, others may vary depending on your specific model. Use the tabs to select the guide tailored to your product.
Before deploying custom autonomous sessions onto your drone, practice flying with the built-in basic autonomy features of the MRS UAV System. These include two core functionalities and example sessions, which will form the foundation for your custom sessions.
This tutorial assumes that you have the MRS UAV System installed on your drone.
Before You Start
For this first autonomous flight, you will use one of the example sessions prepared for you. We also assume that you have been through all the previous tutorials in this chapter. Do not perform this autonomous flight if you did not fly the drone manually once and the calibration has not been performed. You will also need a safety pilot that will be able to intervene if something is off during the flight. It is the pilot's responsibility to make sure that the drone is ready to fly by checking it visually but more importantly by performing a manual flight.
- Docker
- Native installation
- RoboFly
The drone's home folder contains one example_session/<name> folder per flight profile, for example example_session/outdoor (GPS, for open-air flights) and example_session/indoor (LIO, for GPS-denied flights using the onboard lidar). Pick the one that matches your environment; the rest of this guide uses outdoor in its examples, but the same steps apply to any other session folder.
Powering the Drone and Connecting to the Network
During the flight, the drone and your computer should be connected to the same network. Make sure to have your network coverage big enough to cover the flight area.
-
Place the drone at the location which you want to be the center of the safety area. This location should be safe to take-off. The drone should be placed on an approximately leveled surface with a support below all legs.
-
Make sure the RC is powered and all switches are pushed to their last position (away from you).
-
Power the drone with the battery connected to a buzzer and turn on the computer. Make sure that you configured the drone to the correct network beforehand. It should automatically connect to the Wi-Fi you set up.
-
Connect to the drone using ssh connection, replacing
<static_ip_of_the_drone>with the actual static IP address of your drone:ssh uav@<static_ip_of_the_drone>Refer to the Network page for more information on how to connect to the drone.
Environment and Safety Area
Before any flight, it is important to check the environment for potential obstacles or danger. The drone is already configured to fly in a safety area, which is defined in the session's world_f4f.yaml file. This file is located in the tmux/config/ folder of the session you are using. This file is the description of the world in which the drone was tested and it is used to define the safety area. You have to edit or create a new world_my_world.yaml file to define your own safety area. These are the most common parameters that you will have to edit in the world_my_world.yaml file:
mrs_uav_managers.world_origin.origin_x/origin_y: the latitude/longitude of the world origin.mrs_uav_managers.safety_area_manager.safety_area.horizontal.points: the polygon (in meters, relative to the origin) defining the safety area boundary.mrs_uav_managers.safety_area_manager.safety_area.vertical.max_z/min_z: the minimum and maximum allowed flight altitude.
If you plan to fly autonomously with an additional payload (e.g., different sensors, batteries, or extra equipment), it is crucial to update the drone's weight parameter. An incorrect weight configuration can lead to either a failed takeoff or an unsafe, excessive ascent. To prevent this, after adjusting the drone's payload, measure the new total weight (in kg), power on the drone, connect to it, and update the compose.yaml file by modifying the line - UAV_MASS=XXX, replacing XXX with the new weight value.
Connecting to ROS Core Remotely
This session runs on ROS 2 with rmw_zenoh_cpp as the middleware, and the zenoh router itself runs inside the container (visible as the zenoh tab once the session is launched). Unlike the native ROS1 setup, there's no ROS_MASTER_URI to export by hand — as long as your computer uses the same ROS_DOMAIN_ID and RMW_IMPLEMENTATION, and is on the same network as the drone, zenoh's multicast discovery finds the router automatically. Add the following to the .bashrc (or .zshrc) file on your computer:
export ROS_DOMAIN_ID=0
export RMW_IMPLEMENTATION=rmw_zenoh_cpp
Match ROS_DOMAIN_ID to the value configured in the session's compose.yaml (0 by default). If you build your own ROS2 workspace to visualize or interact with the drone from your PC, see Develop Your Own Packages — its Docker setup uses the same MRS UAV System image and X11 forwarding, so tools like Rviz display on your desktop the same way.
Launching the Session
Once logged inside the drone, it is a good practice to start the session and check the 'status' tab to see that everything is working properly.
Since the safety button has not been pressed and the drone is not armed, it is ok to do so even with the propellers already on.
Within the terminal where the drone is connected, browse to the session folder and run it:
cd ~/example_session/outdoor
./start.sh
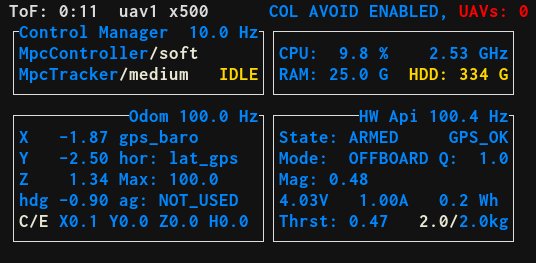
Behind the scenes this builds the image if it's missing, starts (or reattaches to) the mrs-system container, and attaches you to the tmux session running inside it. Browse the different tabs of the main window to make sure there are no major issues (these are usually displayed in red). In a general manner, if there is an issue in the system, the boundaries of the rectangles of the 'status' tab (see image below) will be colored in orange or red.
You can detach from the session with your usual tmux detach binding — the container and session keep running in the background, so you can reattach at any time by running ./start.sh again. To fully stop everything, run:
./kill.sh
Takeoff and Start Mission
Press the safety button until you hear the sounds indicating that the safety is off. Make sure that there is no object within a 10 m radius around the drone and no human closer than 15 m or any pre-specified safety distance (if you are flying outside).
If you are not sure about your RC switches configuration, have a look to the RC page
Whenever you will arm the drone, you will have a few seconds to switch to Offboard mode so that the drone will autonomously take off. If you don't do it in time, the drone will by our default settings disarm itself. When you are in the Offboard mode, you can switch to the Position mode, so whenever the pilot need to take over by turning off the Offboard mode, drone will hover (if RC sticks are in the middle). We can decompose the whole procedure with the following steps:
- Make sure the RC is powered, connected to the drone and all switches are pushed to their last position (away from you).
- Arm the drone using the arming gesture you required (see the official website). The rotors should start spinning slowly.
- Switch to Offboard mode by toggling the Offboard switch to its first position (closest to you). The drone should start the takeoff procedure a few seconds after switching to Offboard mode.
If something happens during the flight, toggle the Offboard switch back out of the Offboard mode to take over manual control of the drone. Also you might want to have different positions of the Flight Mode switch (also called SC on most RC), which selects the mode of the control when you are not using the Offboard mode. However, be aware that if the GPS appears to be the problem (if you have a GPS), avoid using the Position mode.
Powering the Drone and Connecting to the Network
During the flight, the drone and your computer should be connected to the same network. Make sure to have your network coverage big enough to cover the flight area.
-
Place the drone at the location which you want to be the center of the safety area. This location should be safe to take-off. The drone should be placed on an approximately leveled surface with a support below all legs.
-
Make sure the RC is powered and all switches are pushed to their last position (away from you).
-
Power the drone with the battery connected to a buzzer and turn on the computer. Make sure that you configured the drone to the correct network beforehand. It should automatically connect to the Wi-Fi you set up.
-
Connect to the drone using ssh connection, replacing
<static_ip_of_the_drone>with the actual static IP address of your drone:ssh uav@<static_ip_of_the_drone>Refer to the Network page for more information on how to connect to the drone.
Environment and Safety Area
Before any flight, it is important to check the environment for potential obstacles or danger.
The current "world" settings are configured to the place where we tested your drone. In order to define and use your own "world" file which will define which frame to consider for the drone odometry as well as the safety area, you have to create a new world_my_world.yaml file. You can copy a file from the example files located at roscd mrs_uav_deployment/config/worlds/. Check the different examples in this folder. Adapt your file by setting the correct latitude and longitude points of your safety area and origin. The frame name description can be found here but it is common to use latlon_origin for the horizontal coordinates and world_origin for the vertical ones.
Save this file to the roscd mrs_uav_deployment/config/worlds/ folder and in order to use is in your experiment you should edit the WORLD_NAME variable in the ~/.bashrc. Locate the variable and replace it by the my_world that you used in world_my_world.yaml.
Apply the change by sourcing this file:
source ~/.bashrc
If you plan to fly autonomously with an additional payload (e.g., different sensors, batteries, or extra equipment), it is crucial to update the drone's weight parameter. An incorrect weight configuration can lead to either a failed takeoff or an unsafe, excessive ascent. To prevent this, after adjusting the drone's payload, measure the new total weight (in kg), power on the drone, connect to it, and update the .bashrc file by modifying the line export UAV_MASS=XXX, replacing XXX with the new weight value.
Connecting to ROS Core Remotely
Unlike the simulation framework, Rviz does not start on its own for the real world deployment. To use Rviz on your computer and have it connected to the ROS core running on the drone you should add a line to the .bashrc (or .zshrc) file on your computer in the home folder. Open this file and look for any existing ROS_MASTER_URI variable. Comment it out and add the following line
export ROS_MASTER_URI=http://<server-hostname>:11311
This command exports the environment variable ROS_MASTER_URI, so you don't need to set it manually every time when you open a new terminal.
The <server-hostname> should be specified in /etc/hosts on your computer, and <client-hostname> should be specified on the drone's computer. You should be able to ping one from another using just its hostname. If it is not specified on your computer and on the drone, please add it.
Launching the Session
Once logged inside the drone, it is a good practice to start the tmux session to check the 'status' tab and see that everything is working properly.
Since the safety button has not been pressed and the drone is not armed, it is ok to do so even with the propellers already on.
Within the terminal where the drone is connected, browse for the tmux session:
cd ~/example_session/
Then run the tmux session
./tmux.sh
Browse the different tabs of the main window to make sure there are no major issues (these are usually displayed in red). In a general manner, if there is an issue in the system, the boundaries of the rectangles of the 'status' tab (see image below) will be colored in orange or red.
You can also check that your computer is connected to the ROS core running on the drone. Open a terminal on your computer (not another window/tab in the drone ssh session) and run the following command:
roslaunch mrs_uav_deployment rviz.launch uav{id_of_the_drone}
Rviz should start and you should be able to see the frames of the drone as well as the safety area.
Once you are done, you can kill the session using the binding CTRL button + A then K buttons and confirm with the "9" button. You are now ready for your first autonomous flight.
Takeoff and Start Mission
Press the safety button until you hear the sounds indicating that the safety is off. Make sure that there is no object within a 10m radius around the drone and no human closer than 15 m or any pre-specified safety distance (if you are flying outside).
If you are not sure about your RC switches configuration, have a look to the RC page
Whenever you will arm the drone, you will have a few seconds to switch to Offboard mode so that the drone will autonomously take off. If you don't do it in time, the drone will by our default settings disarm itself. When you are in the Offboard mode, you can switch to the Position mode, so whenever the pilot need to take over by turning off the Offboard mode, drone will hover (if RC sticks are in the middle). We can decompose the whole procedure with the following steps:
- Make sure the RC is powered, connected to the drone and all switches are pushed to their last position (away from you).
- Arm the drone using the arming gesture you required (see the official website). The rotors should start spinning slowly.
- Switch to Offboard mode by toggling the Offboard switch to its first position (closest to you). The drone should start the takeoff procedure a few seconds after switching to Offboard mode.
If something happens during the flight, toggle the Offboard switch back out of the Offboard mode to take over manual control of the drone. Also you might want to have different positions of the Flight Mode switch (also called SC on most RC), which selects the mode of the control when you are not using the Offboard mode. However, be aware that if the GPS appears to be the problem (if you have a GPS), avoid using the Position mode.
At this point, you should be familiar with everything necessary for autonomous flight with RoboFly. You will need to run stacks from Portainer and ensure bidirectional communication between your PC and RoboFly to execute ROS commands.
First Autonomous Flight with RoboFly
Autonomous flight with GPS enables outdoor operation of RoboFly in a predefined arena, along trajectories, and more. If your RoboFly and PC are correctly configured, follow these steps:
-
Complete the Pre-flight Checklist.
-
Confirm GPS activation (green light).
-
Mount the propellers securely and verify proper configuration and rotation direction.
-
Set all RC switches to their default (down) positions.
-
Connect to the Portainer GUI and run the
mrs_uav_system_gnnsstack. -
In your terminal, execute the following command, substituting your RoboFly number:
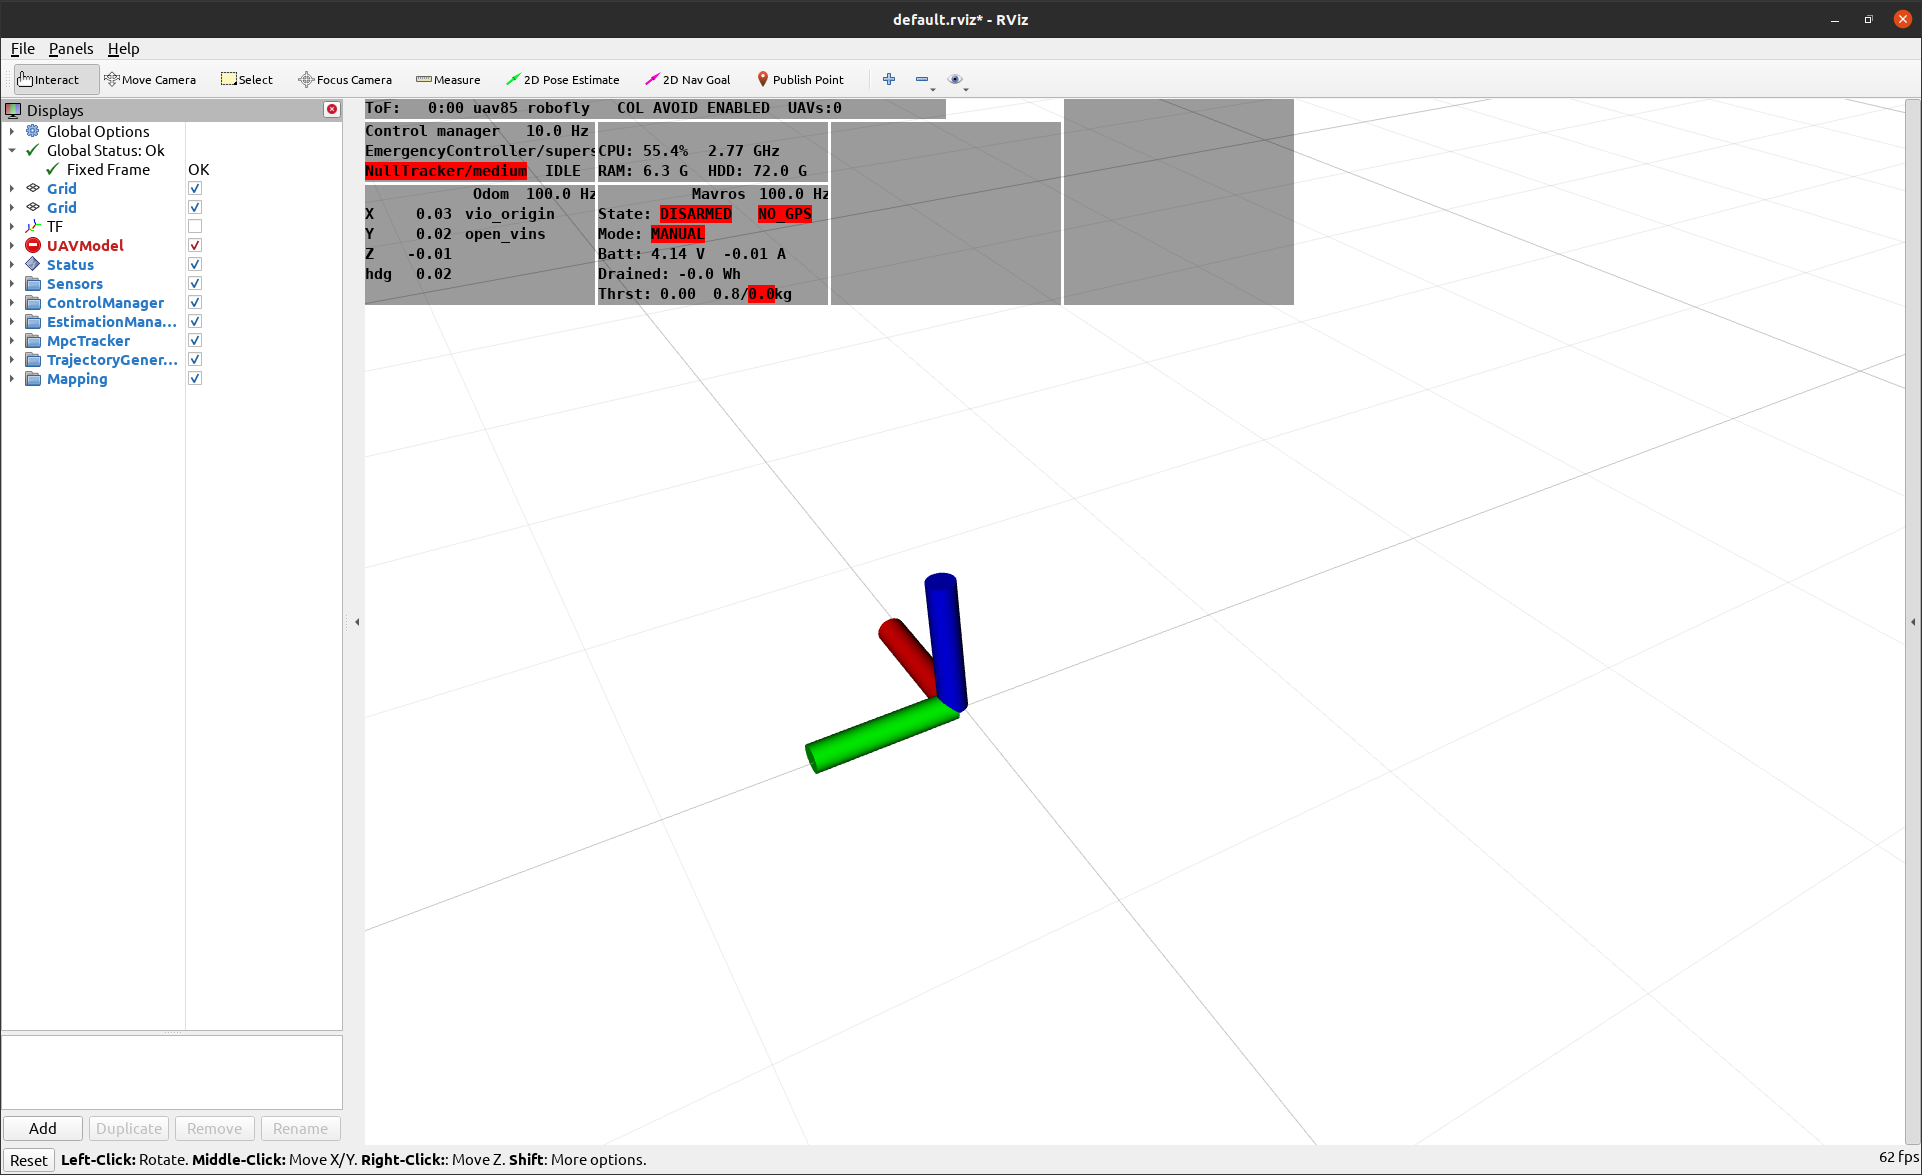
rosrun mrs_uav_deployment rviz.sh uav85- This will launch RViz and export necessary variables.
- The RoboFly’s frame of reference should appear.
-
Step at least 10 meters away from RoboFly and arm it using the assigned gesture.
- If an error occurs, the system will prevent arming. Check the QGroundControl for details.
- If successful, the propellers will start spinning at low speed.
- If you do not continue within 10 seconds, the RoboFly will disarm.
-
Flip the SWA switch to Offboard mode.
- If an error occurs, the system will prevent switching to Offboard mode (antenna blinks red). Check the logs in the running take-off stack for details.
- If successful, the propellers will spin faster for approximately 5 seconds, and RoboFly will perform a takeoff maneuver, hovering at a height of 1.5 meters.
-
Land the RoboFly by using the SWD switch twice with a two-second pause or by right-clicking the reference frame in RViz and selecting Land or Land Home.
To test additional capabilities, run the example session:
- Disarm RoboFly and flip RC switches to default position.
- Perform the same from step 3 onwards but run an additional stack called
user_sessionalongside the existing stack.- RoboFly will take off to 1.5 meters, perform a 360° rotation, and then land.
First Autonomous Flight with VIO
Autonomous flight with VIO allows indoor operation of RoboFly using your custom sessions. The process is similar to GPS-based flight but requires an initial kick to initialize VIO. Follow these steps:
-
Complete the Pre-flight Checklist.
-
Mount the propellers securely and verify proper configuration and rotation direction.
-
Set all RC switches to their default (down) positions.
-
Ensure RoboFly remains stationary during the next two steps (leveling is not required, but it must remain still).
-
Connect to the Portainer GUI and run the
mrs_uav_system_viostack. -
In your terminal, execute the following command, substituting your RoboFly number:
rosrun mrs_uav_deployment rviz.sh uav85- This will launch RViz and export necessary variables.
- The reference frame will not appear immediately.
-
Perform the initial kick to initialize VIO:
- The VIO system uses the bottom-facing camera to orient itself. It requires a surface with sufficient distinguishable features. Uniform, reflective, poorly lit or moving surfaces will not work (grass, white floor, dark carpets). The camera also cannot be burried or otherwise obscured.
- Carefully lift RoboFly into the air.
- Move it around a little, then gently and slowly place it back on the ground.
- Avoid harsh movements or impacts.
- If successful, the reference frame will stabilize in RViz.
- If the reference frame drifts, repeat the process. Close RViz, stop the stack, and return to step 4.
-
Step at least 10 meters away from RoboFly and arm it using the assigned gesture.
- If an error occurs, the system will prevent arming. Check the QGroundControl for details.
- If successful, the propellers will start spinning at low speed.
- If you do not continue within 10 seconds, the RoboFly will disarm.
-
Flip the SWA switch to Offboard mode.
- If an error occurs, the system will prevent switching to Offboard mode (antenna blinks red). Check the logs in the running take-off stack for details.
- If successful, the propellers will spin faster for approximately 5 seconds, and RoboFly will perform a takeoff maneuver, hovering at a height of 1 meter.
-
Land RoboFly by right-clicking the reference frame in RViz and selecting Land or Land Home, or by using the SWD switch twice with a two-second pause.
- Landing action is taken as finishing the session and you need to restart the stack to fly again.
To test additional capabilities, run the example session:
- Disarm RoboFly and flip RC switches to default position.
- Perform the same from step 3 onwards but run an additional stack called
user_sessionalongside the existing stack.- RoboFly will take off to 1 meter, perform a 360° rotation, and then land.
Tips and Next Steps
At this stage, your safety pilot should practice interacting with RoboFly during basic autonomous flights. Experiment with:
- Temporarily taking control in all flight modes using the SWC switch.
- Switching entirely out of Offboard mode and using the Escalating Switch.
Practice these scenarios first outdoors with GPS and then indoors. Once comfortable, you can deploy custom stacks and begin experimenting. More on that in the next chapter.
Always follow the steps outlined above, depending on your flight environment. Run custom stacks on top of the basic mrs_uav_system_* stack. Test your sessions thoroughly in simulation first, and ensure your safety pilot is ready to manage unexpected behaviors.
During your autonomous flying, have the SWB switch set to Position mode (up) and both your sticks in the middle. You can do this after you switch to Offboard mode and take off. Doing this will ensure the easiest starting position when you need to switch to manual mode and take over. Do this even for the VIO flight, as the Position mode will fall into the Altitude mode.
There are cases when the onboard computer can disarm the RoboFly. Refer to MRS Wiki for details (TODO).
The system will prevent going into Offboard mode in several scenarios, taking into account the worst case scenario. Since the take-off procedure always follows the switch to Offboard, you do not want this to happen, for example, during flight. Therefore, if it seems like the RoboFly moves (drifting RViz during VIO initial kick) or that you fly manually before starting the autonomous flight, the computer will not allow to switch to Offboard mode.